
Mastering ISO: The Fun and Easy Guide to Perfect Photos
Are you tired of taking blurry, dark, or noisy photos? Do you hear the term “ISO” and feel a sense of confusion? Don’t worry, you’re not alone! Understanding ISO is one of the key steps to unlocking your camera’s full potential and capturing stunning images. Think of ISO as your camera’s secret superpower for seeing in the dark. It’s one of the three pillars of photography, alongside aperture and shutter speed, and together they form the magical “exposure triangle.”
What is ISO? The Basics, Made Simple
ISO stands for the International Organization for Standardization, but for photographers, it’s just a number that tells you how sensitive your camera’s sensor is to light.
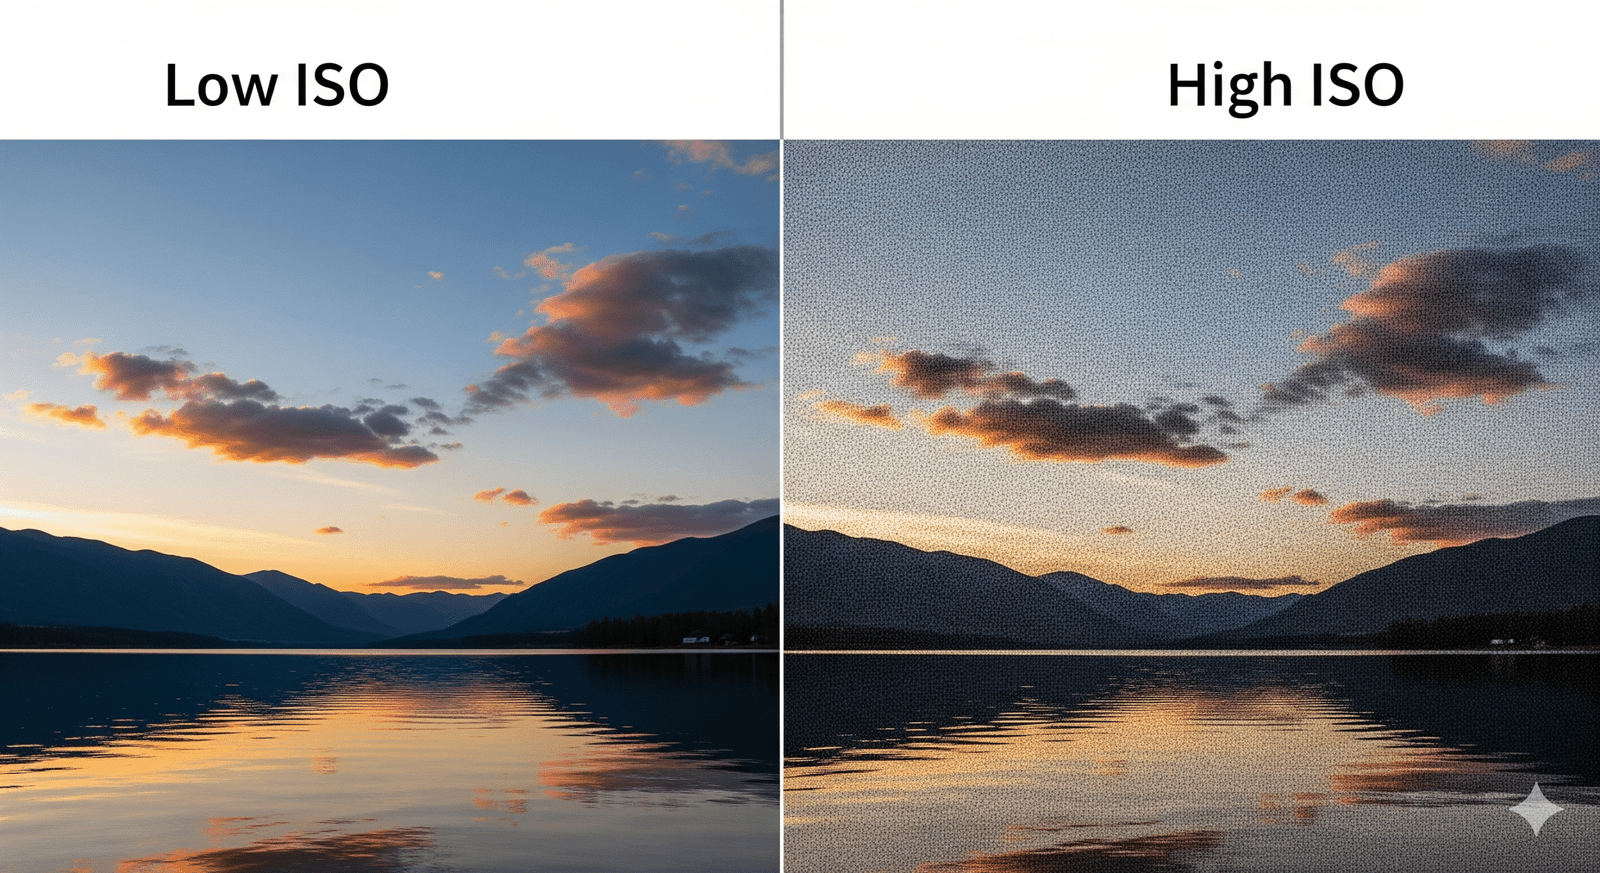
- Low ISO (e.g., 100, 200): Your camera is less sensitive to light. This is your go-to for bright, sunny days. The result? A clean, crisp, and high-quality image with no visible grain.
- High ISO (e.g., 1600, 3200): Your camera is highly sensitive to light. This is your best friend when shooting in low-light conditions, like indoors or at night. The trade-off? You’ll get a brighter photo, but it may have digital “noise” or graininess.
Think of it like this: a low ISO is like having a quiet conversation in a well-lit room, while a high ISO is like shouting in a dimly lit space, you’ll get your point across, but it might be a little rough around the edges.
In this guide, I’ll break down what ISO is, how it works, and give you fun, practical tips to help you master it. Get ready to transform your photography from guesswork to pure art!
The ISO Scale: A Step-by-Step Power-Up
The ISO scale works in a simple, predictable way. Each time you double the ISO number (from 100 to 200, 200 to 400, etc.), you are essentially doubling your camera’s sensitivity to light. This is measured in “stops.” Increasing your ISO by one stop lets in twice as much light, giving you a powerful tool to adapt to any lighting situation.
The ISO Effect: Clean vs. Gritty Photos
ISO is all about balance. Here’s how it impacts your photos:
- Exposure: Higher ISO allows you to shoot in low light without needing a slow shutter speed (which can cause motion blur) or a wide aperture (which affects your depth of field). It gives you the flexibility to get a properly exposed shot in tricky situations.
- Image Quality: This is where the magic (or the mayhem) happens. High ISO can introduce digital noise, which looks like tiny specks or grain in your image. While a little bit of noise can add a cool, artistic, film-like feel, too much can make your photo look messy. The goal is to find the perfect balance!
- Color & Detail: When you push your ISO too high, you might notice that colors become less vibrant and you lose some of the fine details and textures in your shadows. Low ISO, on the other hand, gives you rich, vibrant colors and sharp details.
Pro Tips to Master Your ISO Settings
Ready to become an ISO expert? Follow these tips and tricks to get the best results every time.
- Start Low, Go High Only When Needed: Always begin with the lowest possible ISO setting (usually 100 or 200) to ensure the highest image quality. Increase it only if you can’t get a good exposure using your aperture or shutter speed.
- Experiment with the Exposure Triangle: Before you crank up the ISO, see if you can adjust your aperture or shutter speed first. A wider aperture (a smaller f-number) lets in more light, and a slower shutter speed captures light for a longer time.
- Know Your Camera’s Personality: Every camera is different. Some can handle high ISO settings with minimal noise, while others get grainy quickly. Take some test shots at different ISOs (like 800, 1600, and 3200) to see what your camera can handle without sacrificing too much quality.
- Use ISO Auto Mode with a Strategy: Many cameras have an “Auto ISO” feature. This can be super handy, but it might not always choose the ideal setting for your artistic vision. Use it for quick snaps, but take manual control for more serious photography.
- Embrace Post-Processing: Noise reduction tools in software like Adobe Lightroom or Photoshop can work wonders. While it’s always best to get the shot right in the camera, these tools can save a noisy image and make it look much cleaner.
- Use a Tripod for Clarity: When shooting in very low light, a tripod is your best friend. It stabilizes your camera, allowing you to use a low ISO and a long shutter speed to capture a super-clean, stunning image without any camera shake.
ISO in Action: Real-World Examples
- Bright Sunny Day: Keep your ISO at 100 or 200. You have plenty of light, so you want the best possible quality.
- Indoor Event: You might need to bump your ISO up to 800 or 1600 to capture the action without motion blur from a slow shutter speed.
- Night Photography (Stars or Cityscapes): This is where high ISO (1600-3200+) shines. You need all the light-gathering power you can get to capture faint starlight.
Final Thoughts
Mastering ISO gives you the freedom to shoot in any lighting condition, from bright daylight to a dimly lit concert hall. It’s a tool for creative control that allows you to get the shot you want, every time. So grab your camera, experiment with your ISO settings, and start creating beautiful, high-quality images. Happy shooting!
Did you enjoy this post? Do you want to know when the next post comes out? Consider subscribing. I only send update emails once a week, usually on Friday. Try it out. You can unsubscribe at any time.
2 thoughts on “Understanding ISO”
Your work strikes a balance that few writers manage to achieve, it is both intellectually stimulating and emotionally resonant. There is a seamless flow from one idea to the next, and each paragraph is like a stepping stone leading the reader toward a deeper understanding of both the topic and the self. I feel as though I’ve gained not just knowledge, but a new way of seeing the world.
Thank you so much for this incredibly thoughtful and kind comment! It truly made my day to hear that the post resonated with you on such a deep level. I’m thrilled to know it helped you gain a new perspective on photography. Your words are a wonderful reminder of why I love to write about this topic.